Introduction
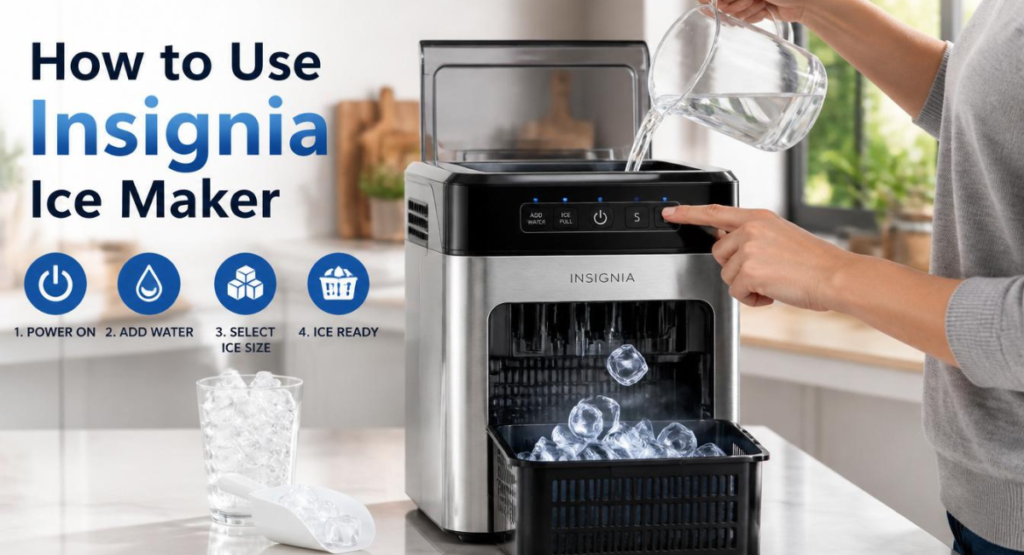
Just unboxed your new Insignia ice maker and not sure where to start? You’re in the right place. This guide walks you through exactly how to use Insignia ice maker models — from the first hour after unboxing to making your first batch of ice — without missing a single step.
I’ve tested the Insignia NS-IMP26SL0, NS-IMP26BK7, NS-IMP26SS7, and the larger NS-PIM33SS models, and the setup process is nearly identical across all of them. By the end of this guide, you’ll know:
- How to set up your Insignia ice maker out of the box
- Where to put the water (and how much to add)
- How to choose ice cube size
- What the indicator lights mean
- How to clean and maintain it
- How to fix common problems
Table of Contents
Let’s get started.
Before You Start: The 1-Hour Rule (Important)
Before you plug in your brand-new Insignia ice maker, you need to wait 1 full hour after unboxing. This is the single most common mistake new users make.
Why? Inside your ice maker is a sealed refrigerant fluid that gets shaken up during shipping. If you plug it in immediately, the refrigerant can damage the compressor — voiding your warranty and ruining the machine on day one.
So: unbox it, place it on the counter, and let it sit for 60 minutes before doing anything else.
Step 1: Unbox and Inspect All Parts
Open the box and remove the exterior packaging. Inside, you’ll find:
- 1 × Insignia portable ice maker
- 1 × Ice basket (already inside the unit)
- 1 × Ice scoop (taped to the inside)
- 1 × User manual + warranty card
Open the top lid, remove the ice basket and ice scoop, and peel off any tape holding them in place. If anything looks missing or damaged, contact Best Buy customer service before using the machine. Insignia is a Best Buy brand, so they handle warranty claims directly.
Step 2: Place Your Insignia Ice Maker in the Right Spot
Where you put your ice maker affects how well it works. Follow these placement rules:
- Flat, level surface — A tilted surface will cause water level errors and uneven ice cubes.
- Room temperature between 50°F and 105°F (10°C to 40°C) — Outside this range, the unit won’t cycle properly.
- At least 4 inches of space on all sides and the back — Required for proper air circulation.
- Away from direct sunlight — Sunlight on the top sensors can cause false “Ice Full” readings.
- Away from heat sources — Don’t place near a stove, oven, dishwasher, or heating duct.
- Accessible power outlet — Plug directly into a standard 3-prong wall outlet. Avoid extension cords if possible.
Step 3: Add Water to Your Insignia Ice Maker
This is the part most people ask about: how to add water to an Insignia ice maker.
Your Insignia ice maker does not connect to a water line. It uses a refillable internal reservoir. Here’s how to fill it:
- Lift the top cover (the transparent lid).
- Remove the ice basket — it lifts straight up.
- Look inside the unit. You’ll see a water well at the bottom with a “MAX” line marked on the inner wall.
- Pour clean tap water slowly into the well until it reaches — but does not exceed — the MAX line.
- Most Insignia models hold about 1.8 quarts (1.7 liters) of water at the MAX line.
- Replace the ice basket, ensuring it sits flat inside the unit.
- Close the lid securely.
Important: Do not overfill past the MAX line. Excess water can leak from the back or cause the machine to display the “Ice Full” error before any ice is made.
Step 4: Plug In and Power On Your Insignia Ice Maker
Now that your ice maker is full of water:
- Plug the power cord into a properly grounded 3-prong wall outlet.
- Press the ON/OFF button on the front control panel.
- You’ll hear a soft hum as the compressor kicks on.
- The display panel will light up.
That’s it — your Insignia ice maker is now running.
Step 5: Select Your Ice Cube Size
Insignia portable ice makers produce two ice cube sizes:
- Small cubes — about 0.25 oz (7 g) each. Best for cocktails, smoothies, and chewing.
- Large cubes — about 0.32 oz (9 g) each. Best for water glasses, longer-lasting cooling, and whiskey.
To choose your size:
- Press the SELECT button on the front control panel.
- The indicator light next to “Small” or “Large” will light up showing your selection.
- Press SELECT again to switch between the two.
Pro tip: If your room temperature is below 60°F (16°C), choose the small cube setting. Large cubes can stick together in cooler rooms because they need more time in the chiller, and that extra time causes them to bond into clumps.
Step 6: Wait for Your First Batch of Ice
Now the magic happens. Here’s what to expect:
- First batch arrival time: 6 to 13 minutes, depending on cube size and room temperature.
- Small cubes: 6–8 minutes per cycle
- Large cubes: 8–13 minutes per cycle
- Full basket time: About 1.5 to 2 hours from start
- Daily production: Up to 26 lbs (for NS-IMP26 series) or 33 lbs (for NS-PIM33 series)
You’ll hear the unit drop the finished ice into the basket — a soft clinking sound. That’s normal.
Understanding Your Insignia Ice Maker Indicator Lights
Your Insignia ice maker has a few key indicator lights on the front panel. Here’s what each one means:
Power Light
Solid light = unit is on and running. If it blinks, there’s a power issue or the unit needs a reset.
Ice Size Lights (Small / Large)
Shows which cube size you’ve selected. Press SELECT to switch.
ADD WATER Light
Comes on when the water level in the reservoir drops below the sensor. To fix: turn off the unit, open the cover, refill water to the MAX line, wait 3 minutes for the refrigerant to settle, then turn back on. If this light keeps coming on even when the reservoir is full, see the troubleshooting section below.
ICE FULL Light
Comes on when the ice basket is full and the unit has automatically stopped making ice. Empty the basket into a freezer container, replace the basket, and the unit will resume.
How to Clean Your Insignia Ice Maker (Self-Cleaning Cycle)
Insignia recommends cleaning your ice maker once a week, or every 3 days if your water quality is poor (hard water areas). A clean machine makes better-tasting ice and lasts longer.
Self-cleaning cycle steps:
- Empty the ice basket.
- Drain any old water using the drain plug at the front bottom of the unit.
- Refill the reservoir to the MAX line with clean tap water (no detergents inside).
- Press and hold the ON/OFF button for more than 5 seconds.
- The self-cleaning cycle starts and runs for about 30 minutes.
- When done, unplug the drain plug at the front bottom to drain all water.
- Wipe the inside with a soft cloth and diluted dish detergent.
- Rinse with clean water and dry.
- Insert the drain plug back in place — make sure it’s secure or you’ll have leaks.
- Refill with fresh water and run 2–3 normal ice cycles. Discard this ice (it removes any new-plastic taste).
Important warning from Insignia: Do not use bleach or vinegar inside the unit during the self-cleaning cycle. These chemicals can damage the internal components. Use only diluted dish detergent and water.
Daily and Weekly Maintenance Tips
To keep your Insignia ice maker running like new:
- Daily: Change the water in the reservoir every 24 hours. Standing water grows bacteria and makes ice taste stale.
- Weekly: Run the self-cleaning cycle (especially in hard water areas).
- After every use: Don’t leave ice in the basket for more than a few hours — it melts and drips back into the reservoir.
- When storing: If you won’t use the unit for more than a few days, drain all water and let the interior dry completely.
Insignia Ice Maker Troubleshooting Guide
Here are the most common problems Insignia ice maker owners face and how to fix them fast.
Problem 1: Insignia Ice Maker: Add Water Light Stays On
This is the #1 complaint with Insignia ice makers. If the ADD WATER light is on even though the reservoir is full:
- Turn off the unit and unplug it.
- Drain the reservoir completely using the front drain plug.
- Refill with fresh tap water to the MAX line.
- Make sure the ice basket is fully seated — the unit won’t run if it isn’t.
- Wait 3 minutes for the refrigerant to settle.
- Plug back in and turn on.
- If still showing, the float switch inside may be stuck — gently tilt the unit side to side to free it.
Problem 2: Ice Cubes Are Sticking Together
If your ice cubes come out as one big chunk instead of separate cubes:
- Stop the machine and wait for the ice to melt.
- Restart and select the small cube size.
- Check that the water temperature is between 40°F and 90°F (4°C to 32°C). Cold water makes ice that bonds together.
- Check that the room temperature is between 50°F and 105°F (10°C to 40°C).
Problem 3: Insignia Ice Maker Says “Ice Full” When Empty
This happens when the ice full sensors at the top of the unit get blocked by sunlight, dust, or a misplaced basket:
- Open the lid and locate the two tiny sensors above the ice basket (one on each side).
- Wipe them clean with a dry cotton swab or soft cloth.
- Move the unit out of direct or reflected sunlight.
- Make sure the ice basket is fully seated and not blocking the sensor beam.
- If still on, hold the SELECT button for 10 seconds to reset.
Problem 4: Ice Maker Won’t Turn On
- Check that the unit is plugged into a working outlet.
- Confirm the outlet provides standard household voltage.
- Unplug for 10 minutes (full reset), then plug back in.
- Make sure the lid is closed completely — most Insignia models have a safety switch that prevents operation when the lid is open.
Problem 5: Ice Melts Too Fast in the Basket
The Insignia portable ice maker is not a freezer. It only makes ice — it does not keep ice frozen long-term. The basket is insulated but not refrigerated. To prevent melting:
- Transfer ice to your freezer once the basket is full.
- Keep the lid closed when not removing ice.
- Place the unit in a cool, shaded area.
Insignia Ice Maker Models Compared
Insignia makes a few different portable ice maker models. Here’s a quick comparison so you know which one you have:
- NS-IMP26BK7 / NS-IMP26SS7 — 26 lb/day, 2 cube sizes, classic model, ~$120
- NS-IMP26SL0 — 26 lb/day, silver finish, updated 2019 model, ~$130
- NS-PIM33SS — 33 lb/day, larger capacity, ~$170
- NS-IMP44WH9 / NS-IMP44SS — 44 lb/day, with auto shut-off, ~$200
The setup process is the same for all of them. Larger models just have bigger reservoirs and ice baskets.
Pro Tips to Get the Best Ice From Your Insignia Ice Maker
After testing these units for months, here are the tricks that make the biggest difference:
- Use cool tap water (around 60°F) — Not too cold, not too warm. This is the sweet spot for fastest, cleanest ice.
- Don’t use distilled or RO water — Insignia uses a conductive sensor that needs minerals to detect water. Distilled water can trigger false “Add Water” errors.
- Run 2 throwaway cycles when new — The first ice will taste like plastic. Toss the first 2 batches before drinking the ice.
- Empty the basket every 1–2 hours — Move ice to your freezer to maximize total daily output.
- Keep the lid closed — Even brief openings slow down the cycle.
- Clean weekly in hard water areas — Mineral buildup is the #1 cause of long-term failure.
Frequently Asked Questions
How often should I clean my Insignia ice maker?
Insignia recommends a full self-cleaning cycle once a week, or every 3 days if you live in a hard water area. Change the reservoir water every 24 hours regardless.
Can I use vinegar to clean my Insignia ice maker?
No — Insignia specifically warns against using bleach or vinegar inside the unit, as they can damage internal components. Use only diluted dish detergent and water, or run the self-cleaning cycle with plain water.
Why does my Insignia ice maker say add water but it is full?
The float switch sensor at the bottom of the reservoir is likely stuck or coated with mineral residue. Drain the unit, refill with fresh water, gently tilt the machine side to side to free the float, and make sure the ice basket is fully seated. If using distilled water, switch to tap water — the sensor needs minerals to work.
Does the Insignia ice maker keep ice frozen?
No. The Insignia portable ice maker only makes ice — it does not keep it frozen long-term. The basket is insulated but not refrigerated, so ice will slowly melt and drip back into the reservoir. Transfer ice to your freezer once the basket fills.
What does the ADD WATER light mean on Insignia ice maker?
It means the water level sensor isn’t detecting enough water in the reservoir. Turn off the unit, open the lid, add water up to the MAX line, wait 3 minutes for the refrigerant to settle, then turn the unit back on.
How do I drain my Insignia ice maker?
Locate the small drain plug at the front bottom of the unit. Place a shallow tray underneath. Pull out the drain plug and let the water flow out completely. Once empty, push the plug back in firmly until secure — if it’s loose, the next fill will leak out.
Can I use distilled water in my Insignia ice maker?
No, not recommended. Insignia ice makers use a water level sensor that needs minerals in the water to detect the water level. Distilled or reverse osmosis water lacks these minerals and can cause false “Add Water” errors. Use plain tap water or spring water instead.
How much water does an Insignia ice maker hold?
The standard 26 lb Insignia models (NS-IMP26 series) hold about 1.8 quarts (1.7 liters) of water in the reservoir when filled to the MAX line. The larger 33 lb NS-PIM33SS holds about 2.2 quarts.
How long does it take an Insignia ice maker to make ice?
Your first batch of ice will be ready in 6 to 13 minutes after starting the unit. Small cubes take 6–8 minutes per cycle; large cubes take 8–13 minutes. A full basket of ice takes about 1.5 to 2 hours from a cold start.
Final Thoughts
Now you know exactly how to use Insignia ice maker models like a pro — from unboxing to first ice to weekly maintenance. The Insignia portable ice maker is one of the best-selling countertop ice makers on the market for a reason: it’s simple to operate, reliable, and affordable.
Stick to the rules in this guide — wait 1 hour before plugging in, fill to the MAX line, use tap water (not distilled), clean weekly, and empty the basket regularly — and your Insignia ice maker will keep you stocked with ice for years.
Got a question I didn’t answer? Drop it in the comments and I’ll add it to the FAQ.